|
|
|||||||
|
Introduction to Cascading Style Sheets
Cascading Style Sheets provide a very powerful, yet flexible means for formatting html content.
CSS in html works in a similar manner to style sheets in a word processing program, by defining a "style" that contains formatting options that can be applied to the elements in a document.
<html>
<head> <title>A Sample Style</title> <style type="text/css"> <!–– h1 { color: red; text–align: center; } // ––> </style> </head> <body>
The <style> element inside the <head> element in the code example above defines 1 style which sets the font colour of all <h1> elements throughout the document to red.
<h1><font color="red">Heading</font></h1>
If you did use the preceding method (<font> tags) and then later you changed your mind about the formatting, you would then need to change every <h1> element in the document.
Style rulesAll CSS style rules follow the same basic format which is illusrated in the code example below.
selector { property1: value1; property2: value2;
propertyN: valueN; } The formatting of CSS rules is very exact and follows the guidelines listed below:
The selector represents the element that the style definition should be used on, and the properties are the formatting proerties of the selected element that should then be set to the value specified in the style definition.
h1 { color: blue; }
The selector in the code example above (h1 causes the rule to be applied to all the <h1> elements throughout the document.
h1,h2,h3,h4 { color: blue; }
Style Rule Location
There are a few different ways to define CSS styles, they can be defined within an html document, or in a seperate and external style sheet. Style definitions within tags.
Most of the html tags have a style attribute that allows you to specify styles that will directly affect the tag they are applied to.
<h1 style="color: red;">Heading</h1>
Putting your styles between <style> tags or in an external style sheet is a much better practice, than applying the style directly to individual tags. The <style> element.
The <style> element is just the same as other html elements in that it has opening and closing tags.
<html>
<head> <title>Sample document</title> <style type="text/css"> <!–– style definitions ... // ––> </style> </head> <body> Note that between the <style> tags are html comment tags these will hide the style defintions from older browsers that do not understand CSS styles. External style sheets.
You can also place style definitions in a separate file, and then reference the file from within the documents you wish to apply the style definitions to.
/* styles for the main site */
h1 { text–align: center; color: blue; } h2,h3,h4 { color: red; } h1 { font–size: 18pt; } h2 { font–size:: 16pt; } h3 { font–size: 14pt; } h4 { font–size: 12pt; } p { font–size: 10pt; }
An external style sheet can have any valid file name, however it is advisable to use the .css file extension, to easily identify the file and its contents, for example the file could be named mainstyles.css
To link an html document to an external style sheet file, use the <link> tag, in the <head> section of the html document.
<link rel="stylesheet" type="text/css" href="url_to_style_sheet" />
I have used the style sheet file name example above in the <link> tag in the code example below to illustrate what the <link> tag would look like linking the document to the style sheet.
<html>
<head> <title>Sample document</title> <!–– meta tags go here ––> <link rel="stylesheet" type="text/css" href="mainstyles.css" /> </head> <body>
Any style sheet that is accessible by the user via http: can be linked to the same document using the <link> tag.
<link rel="stylesheet" type="text/css"
href="www.somesite.com/styles/mainstyles.css" /> The same document can have several style sheets linked to it, when this situation occurs they follow the cascading guidelines which we will look at in the next section.
Style Sheet Cascade
The basic concept behind Cascading Style Sheets is that multiple style definitions can "trickle" or "cascade" down through several layers to affect an html document.
Each level of styles overrides the previous level where duplicate properties have beeen defined.
/* styles for the main site */
h1,h2,h3,h4 { color: blue; } h1 { font–size: 18pt; } h2 { font–size: 16pt; } h3 { font–size: 14pt; } h4 { font–size; 12pt; } p { font–size: 10pt; }
<html>
<head> <title>Sample document</title> <link rel="stylesheet" type="text/css" href="mainstyles.css" /> <style type="text/css"> <!–– h1 { color: red; } // ––> </style> </head> <body> <h1>Heading</h1> <p> Lorem ipsum dolor sit amet, consectetuer adipiscing elit.Nulla massa purus, mollis elementum, malesuada a, fermentum at, justo. Proin et eros vel nisi rutrum volutpat </p>
What will the colour of the text be in the <h1> heading in the document home.htm in the code example above?
The colour specified in the external style sheet mainstyles.css is blue, but the style element in the <head> section of the document home.htm specifies the colour red for the text in the heading.
An html document can have multiple instances of <style> elements or linked style sheets.
In these cases the style sheets are applied in order, with subsequent definitions overriding any previous definitions.
CSS Box Formatting Model
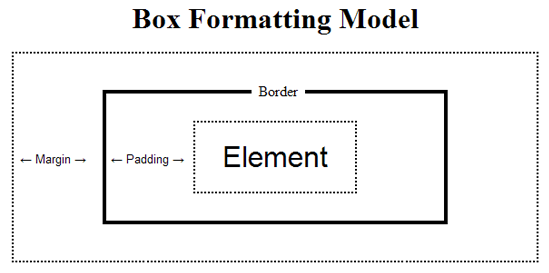
To help specify containers (block–level elements) on a web page, CSS uses a metaphor, the box. 
The screenshot above illustrates the the box formatting model and how the margin, border, padding and the actual element itself relate to each other spatially. The Boxes Dimensions.
As a web page loads the first thing that the browser does is to render the block–level elements to determine what their physical dimensions are, and the font that has been specified, and any contents for the elements, and any other internal formatting instructions specified in the style sheet. 
An elements padding is the distance between the outside edges of the element and it’s border.
Padding.
It is not always necessary to define padding for an element, but if you define a border you may then need to define padding so that the contents of the element do not look too crowded. 
There are five properties associated with padding they are listed below.
You will need to familiarise yourself with the –top, –right, –bottom, and –left additions to property names, this is they way that all box–related properties are specified.
p { padding–top: 10px;
padding–right: 10px; padding–left: 10px; }
You can also use shorthand method to write the padding properties as ilustrated in the code example below.
p { padding: 10px 10px 0px 10px; }
The shorthand method described above also works for margins and borders, also note that there are no commas between the values just spaces.
Border.
An elements default is to have no border, until one is actually defined for the element. The border that is defined in the code example below illustrates the first method and will create a black border on the top, right and the left sides of the <blockquote> element.
blockquote { border–width: 1px 1px 0px 1px;
border–color: black; border–style: solid; } The border that is defined in the code example below uses the second method to create an identical border.
blockquote { border–top: 1px solid black;
border–right: 1px; solid black; border–left: 1px; solid black; } Both the code examples above create the same border, which is inserted between the padding and the margin if either have been defined. Valid values for the border style are listed below.
If you want to create a border on all four sides of an element, you could define the style using the method described in the code example below.
blockquote { border: 1px solid black; }
Margins
An elements margins create white space on the outside of the elements border.
Margins are created using the margin property which can be applied in exactly the same way as the padding property described in the section above.
blockquote { margin–top: 10px;
margin–right: 10px; margin–bottom: 10px; margin–left: 10px; }
blockquote { margin: 10px 10px 10px 10px; }
CSS levels 1, 2, 3
There are three levels in CSS two of the levels are specifications and the third level is in recommendation status, there are notable differences between the two standards levels and the third in recommendation status.
You do not need to specify the level of CSS that you are using in your documents, but you do need to consider the user agents that will access your site. |
||||||
|
|||||||
 CSS can be very complicated when you start to look at the different selector methods, inheritance and the cascade effect itself.
 The last property/value pair of a style definition does not necessarily need to end with a semicolon


